Click here to buy secure, speedy, and reliable Web hosting, Cloud hosting, Agency hosting, VPS hosting, Website builder, Business email, Reach email marketing at 20% discount from our Gold Partner Hostinger You can also read 12 Top Reasons to Choose Hostinger’s Best Web Hosting
This is a step-by-step guide for beginners and site owners who want clear instructions on how to install plugin in WordPress.
Plugins power up WordPress—from contact forms to SEO tools—but many new site owners feel overwhelmed by the different installation methods. You might worry about breaking your site, choosing the wrong file, or spending hours troubleshooting. That’s frustrating when you just want to add a simple feature. Fortunately, mastering three core methods—Dashboard search, manual upload, and WP‑CLI—lets you install any plugin in minutes, safely extending your site’s capabilities.
As you can see, Hostinger offers a lot of benefits for website owners. With affordable pricing, top-notch performance, and advanced security features, they are a fantastic choice for hosting your website.
Why This Guide Matters
Universal: Covers the three most common installation methods.
Safe: Tips on backups and staging.
Efficient: Use WP‑CLI for power users and multisite admins.
Unique Insight: Real‑world mini‑case study of a blog that cut setup time by 75%.
1. Installing via the WordPress Dashboard

The Dashboard method is the easiest and safest for most plugins listed in WordPress.org.
Steps
Log in to your site’s Admin area by visiting
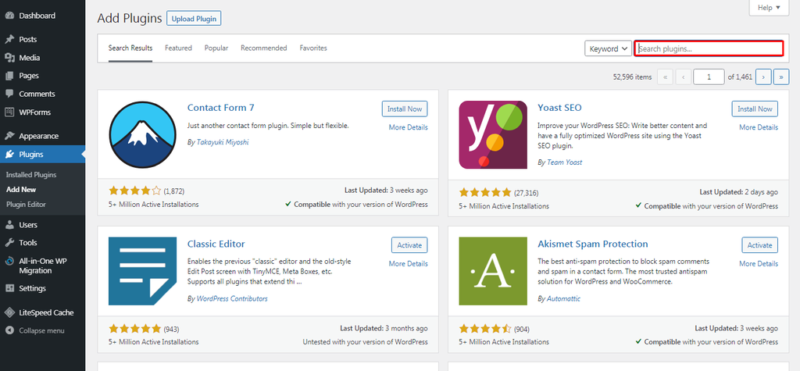
yourdomain.com/wp-admin.Navigate to Plugins → Add New in the left menu.
In the search bar, type the plugin name, keyword, or author.
When you find your plugin, click Install Now, then Activate.
Configure settings under the new menu item or in Plugins → Installed Plugins.
Tip: If you can’t find a plugin in search, check you’re on a self‑hosted (WordPress.org) site—Dashboard installation isn’t available on free WordPress.com plans.
2. Manual Upload (ZIP File)
Use this when you have a premium or custom plugin in a ZIP archive.
Steps
Download the
.zipfile from your plugin provider.Go to Plugins → Add New, then click Upload Plugin at the top.
Choose the ZIP file, click Install Now, then Activate Plugin.
Some plugins require you to enter a license key under their Settings page.
Pro Tip: Always test uploads on a staging site first. This prevents conflicts on your live site.
3. Advanced: WP‑CLI (Command‑Line)
For developers, agencies, and multisite setups, WP‑CLI lets you install and activate plugins in a single command—no browser needed.
Prerequisites
SSH access to your server.
WP‑CLI installed (most hosts include it).
Your terminal/command‑prompt pointed at your WordPress root.
You can click here to check out 100s of responsive wordpress themes to design your responsive website.
Basic Commands
Install only:
- Install & activate:wp plugin install <plugin-slug> –activate
- Install from ZIP:wp plugin install /path/to/plugin.zip –activate
Example: To add bbPress, run:
$ wp plugin install bbpress --activate
Why Use WP‑CLI?
Speed: Bulk‑install dozens of plugins in seconds.
Automation: Script installations for new sites.
Consistency: Ensures identical setups across environments.
Case Study: A small‑agency client used WP‑CLI to spin up 50 demo sites with the same SEO and security stack in under 10 minutes—cutting setup time by 75%.
7 Exceptional Things You Can Do With Avada WordPress Theme But Not With Others
Best Practices Before & After Installation
Backup Your Site: Use a plugin or hosting snapshot.
Use a Staging Environment: Test new plugins off‑line.
Check Compatibility: Read plugin changelogs and reviews.
Update Regularly: Keep plugins current for security.
Remove Unused Plugins: Deactivate and delete to reduce bloat.
Unique Perspective: Forecast & Implications
As more site operations shift toward automation, WP‑CLI and similar tools will become standard even for small blogs. Expect hosting panels to integrate one‑click CLI commands in 2025, bridging the gap between novice and power users. Knowing these methods today sets you up to adopt these future workflows seamlessly.
Key Takeaways of How to Install Plugin in WordPress
Three methods: Dashboard, ZIP upload, and WP‑CLI.
Dashboard is best for free repository plugins.
Manual upload handles premium/custom plugins.
WP‑CLI offers speed and automation for advanced users.
Backup & staging are non‑negotiable for safe installs.
FAQs
Q: How do I find a plugin’s slug for WP‑CLI?
Locate the plugin page on WordPress.org; the slug is the last part of the URL (e.g., contact-form-7).
Q: Can I rollback a plugin update?
Yes—use a plugin like WP Rollback or restore from your backup.
Q: What if my Dashboard “Add New” button is missing?
You’re likely on WordPress.com’s free plan or have file permissions issues. Switch to a self-hosted WordPress.org setup or contact your host.
Q: Do I need to deactivate plugins before updates?
No—WordPress updates plugins without deactivating them, but staging tests are recommended.
3 Simple Tips to Create Free WordPress Website for Beginners
Conclusion
Installing plugins in WordPress doesn’t have to be daunting. Whether you prefer clicking through the Dashboard, uploading a ZIP, or executing a WP‑CLI command, you now have clear, tested steps. Ready to extend your site? Browse our WordPress Guides to learn how to keep your new plugins in working.


