Click here to buy secure, speedy, and reliable Web hosting, Cloud hosting, Agency hosting, VPS hosting, Website builder, Business email, Reach email marketing at 20% discount from our Gold Partner Hostinger You can also read 12 Top Reasons to Choose Hostinger’s Best Web Hosting
Android emulation on PC has come a long way, but even the best players hit frustrating slowdowns, clunky controls, and wasted resources when they’re not tuned just right. You might notice stutters mid‑battle or your PC fans roaring during a light session—small annoyances that sap joy and focus. Luckily, with a few well‑chosen BlueStacks Tips, you can transform your setup into a smooth, responsive gaming powerhouse without needing a hardware upgrade.
3 VPNs That Pass All Tests (2025)
- NordVPN: Zero leaks in tests, RAM-only servers, and Threat Protection to block malware.
- Surfshark: Unlimited devices, Camouflage Mode for bypassing VPN blocks, and CleanWeb ad-blocker.
- ExpressVPN: Trusted Server tech (data wiped on reboot) and consistent streaming access.
Here’s a hand‑picked list of ten actionable tweaks—many under the hood—that you won’t find in generic “install and play” guides. From squeezing extra FPS out of low‑end rigs to streamlining your keybindings, these insights will help you play longer, record crisply, and even run multiple apps side‑by‑side without breaking a sweat.
10 Tips to Make Windows 11 PC Run Smoother
Why Fine‑Tuning BlueStacks Matters
Performance: Default settings prioritize compatibility over speed, so your CPU and GPU may be under‑leveraged.
Controls: On‑screen layouts are fine, but custom keymapping unlocks real PC‑style precision.
Resource Management: Running mobile games alongside other Windows apps can strain RAM and battery.
5 Strong Reasons To Buy M4 MacBook Air at a Record-Low Price
Top 10 BlueStacks Tips
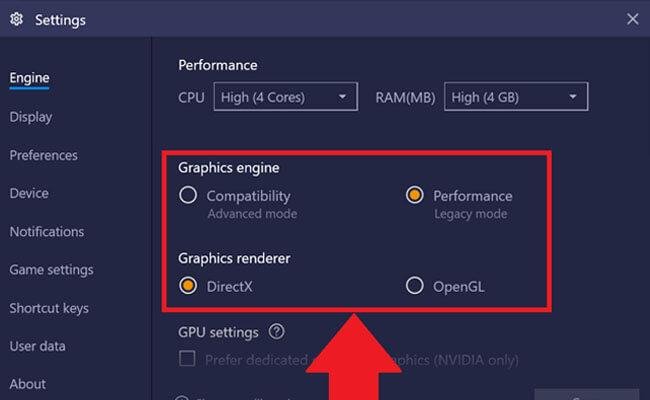
1. Optimize Performance Settings for Smoother Gameplay
Open Settings → Performance and adjust CPU cores and RAM allocation to match your PC’s capacity. Then, cap the frame rate at 30–60 FPS to balance smoothness and resource usage:
Frame Rate: 30 FPS on low‑end, 60 FPS on mid/high‑end rigs
CPU Cores: Allocate half your total cores (e.g., 4 of 8)
RAM: Give at least 4 GB if you have 8 GB total
Engine Mode: Switch to “Performance (Hybrid)” for maximum speed
For detailed steps, see BlueStacks official guide on performance settings.

2. Master Advanced Keymapping for PC‑Style Controls
Press Ctrl + Shift + A or click the keyboard icon to launch the Advanced Game Controls editor. Drag, drop, and customize:
Tap Spot: Map touch to a single key for jumps or casts
D‑Pad: Replace on‑screen joysticks with WASD or arrow keys
Script: Automate sequences (e.g., 3‑button combos)
Free Look: Enable 360° camera turns without dragging
Learn each control’s pro‑level customization here.
3. Harness Eco Mode to Conserve Resources
If you run multiple instances (or background apps), switch to Eco Mode in the Multi‑Instance Manager:
Reduces CPU & GPU usage by up to 80%
Lowers power draw, ideal for laptops on battery
Keeps background bots or macro scripts running without heating
Stop Straining Your Eyes: 5 Affordable Upgrades for a Low‑Vision–Friendly PC Setup
4. Leverage Multi‑Instance for Parallel Play & Testing
Play two accounts, test apps, or run a streaming tool alongside your game:
Open Multi‑Instance Manager
Clone your current instance or create a fresh one
Sync keymaps and settings across instances
Use Eco Mode for any non‑primary instance
How to Remove Malware from a Windows PC for Safer Experience: A Simple Step-by-Step Guide
5. Enable High‑Quality Recording & Streaming
Use built‑in recorder instead of third‑party capture:
Settings → Record: Choose 1080p at 30 FPS (or 60 FPS if your PC handles it)
Use hardware encoder (NVENC/QuickSync) for lower CPU load
Save directly as MP4—no extra conversions
6. Utilize Smart Controls & Macros for Repetitive Tasks
Under Advanced Game Controls, record macros for grinding or farming:
One‑click macros: Launch a tap sequence with a single key
Looped scripts: Automate daily quests or resource gathering
Conditional actions: Stop when a screen change is detected
7. Sync Your Mobile Apps & Games
Keep progress in mobile‑only titles by linking to Google Play:
Sign in with your existing Google account
Enable Cloud Sync in each app’s settings
Use “Sync Across Instances” for instant updates
MacBooks vs Windows PCs in 2025: A Practical Guide to Choosing Your Next Laptop
8. Fine‑Tune Display & DPI Settings
Under Settings → Display:
DPI: Increase to 240–320 for sharper visuals on high‑res monitors
Resolution: Match your PC’s native res or use 1280×720 for speed
Fullscreen Mode: Hide window borders for immersion
9. Connect Your Gamepad or Controller
Plug in via USB/Bluetooth
In Advanced Game Controls, choose Gamepad
Map buttons to in‑game actions for console‑style play
10. Explore Developer Options for Power Users
Enable hidden tweaks under Settings → About BlueStacks, tap Version seven times, then:
Force GPU rendering
Debug GPU overdraw
Show CPU usage overlay
How to Easily Move BlueStacks from SSD to HDD (4 Simple Steps)
Key Takeaways
Allocate resources wisely: Adjust CPU, RAM, and frame rate to suit your hardware.
Customize controls: Advanced keymapping transforms touch‑only games into PC‑grade experiences.
Automate & conserve: Eco Mode and macros keep multi‑taskers cool and efficient.
Record like a pro: Built‑in tools let you capture high‑quality footage without third‑party strain.
Parallel power: Multi‑Instance turns BlueStacks into a versatile testing and gaming lab.
What Comes with Laplink PCmover Ultimate 11 to Transfer Files and Settings to a New PC
FAQs
Q1: Can I run BlueStacks on a budget laptop?
A: Yes—use Eco Mode, cap frame rates at 30 FPS, and limit RAM to 2–3 GB. These tweaks reduce load and heat without sacrificing stability.
Q2: Will custom keymapping work on every game?
A: Most Android titles support BlueStacks’ keymapping, but some protection‑locked apps (like certain banking or DRM‑protected games) may restrict it.
Q3: How do I update BlueStacks without losing settings?
A: Enable “Preserve settings” in the updater, or export your configuration via Multi‑Instance Manager → Export → Save .bluestacks.
Q4: Is BlueStacks safe to use with antivirus software?
A: Absolutely—BlueStacks is digitally signed and widely vetted. Just whitelist the Bluestacks.exe process to avoid false positives.
Conclusion
By applying these BlueStacks Tips, you’ll turn potential bottlenecks into seamless play, whether you’re grinding an RPG, streaming mobile titles, or testing apps on multiple profiles. Ready to level up your PC’s Android emulator? Dive into BlueStacks’ settings now, and don’t forget to subscribe to SmashingApps for more insider guides and performance hacks.
Now loading...


