Click here to buy secure, speedy, and reliable Web hosting, Cloud hosting, Agency hosting, VPS hosting, Website builder, Business email, Reach email marketing at 20% discount from our Gold Partner Hostinger You can also read 12 Top Reasons to Choose Hostinger’s Best Web Hosting
You’re trying to clean up a screenshot or remove a spot quickly in Microsoft Paint, but the eraser is tiny and makes a mess. If you’re wondering How to Increase the Size of Eraser in Paint, that frustration is exactly what this guide fixes — it’s urgent when you need to erase large areas fast and don’t have a numeric keypad or advanced tools. Read on for simple, tested steps, keyboard tricks, and better alternatives that actually save time.
The core purpose of the Surface Copilot PC is to provide an elevated computing experience that blends performance, security, and intelligent features.
Why this guide (who it’s for)
This tutorial is written for SmashingApps readers who need a no-nonsense, step-by-step solution to adjust eraser size in classic Microsoft Paint, Paint 3D / modern Paint, and quick alternatives like Paint.NET. Expect plain language and real workarounds for laptops without a numpad.
Quick answer — the short how-to
Select the Eraser tool in Paint.
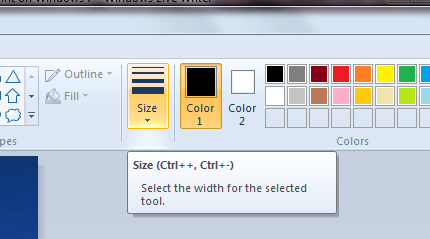
On the Home tab, click Size and pick one of the preset sizes.
For fine-grained increases (1 pixel at a time), use Ctrl + Numpad Plus (+) to grow and Ctrl + Numpad Minus (-) to shrink the active brush/eraser.

Step-by-step: Increase eraser size in classic Microsoft Paint
1. Open Paint and choose Eraser
Launch Paint (type “Paint” in Start).
Click the Eraser icon in the Tools group on the Home ribbon.
2. Use the Size dropdown
On the Home tab, click Size (next to Brushes). Paint offers a handful of preset eraser widths — pick the largest for a quick big eraser. Hover over the canvas to preview the cursor size. This is the simplest method. Microsoft Support
3. Pixel-precise resizing with keyboard (power users)
If you need to increase/decrease one pixel at a time, press Ctrl + Numpad + to grow the tip, and Ctrl + Numpad – to shrink it. This adjusts the brush/eraser incrementally (handy for clean edges). Note: this shortcut requires a numeric keypad. Microsoft Learn
What if you don’t have a numeric keypad? (laptops)
Many laptops lack a numpad, so the Ctrl+Numpad shortcut won’t work. Use one of these workarounds:
On-Screen Keyboard (OSK) method:
Launch Windows On-Screen Keyboard (type “osk” in Start). Use your physical Ctrl and click the plus/minus keys on the OSK numeric pad. This simulates the numpad input.External keyboard or USB numpad:
Plug in a cheap USB numeric keypad — quick and reliable.Remap keys (advanced):
Use AutoHotkey to remap an unused key combo to send NumpadPlus/NumpadMinus. Example: remapCtrl + =to sendCtrl + NumpadAdd. (Only for advanced users; back up scripts before running.)Use the Size dropdown — still the simplest fallback.
Paint 3D and modern Paint differences
Paint 3D: the eraser behaves like a brush and includes a size slider for larger strokes. Use the tool settings to adjust size; it’s more flexible for soft/rounded erasing.
Modern (Windows 11) Paint: Microsoft has been iterating the UI; some users report sliders and different size controls. If you don’t see the old dropdown, check the Brush/Tool settings area or switch to Paint 3D for more control. Microsoft’s built-in photo/paint docs note that drawing/erasing tools expose size controls in the UI. Microsoft Support
Alternatives when Paint can’t cut it
If you need truly large erasers, soft/feathered edges, or more precise masking, consider:
Paint.NET — free, supports
[ ]keys to change brush/eraser size and has plugins for advanced erasing. The Eraser size follows the brush size setting, and you can use bracket keys to resize quickly. Paint.NETGIMP — full-featured, supports soft brushes, eraser opacity, and layer masks.
Photoshop / Affinity Photo — best for professional masking and non-destructive erasing.
Use selection + delete — select the area to remove (lasso/rect), then press Delete; faster for block removals than dragging an eraser.
Smart workflow tips (real-world mini case studies)
Case study 1 — quick screenshot cleanup (product manager)
I take a UI screenshot, open Paint, and need to remove a watermark quickly. Instead of tiny eraser drags, I select Eraser → Size (largest), then drag across the area. For uneven shapes I switch to rectangle selection and Delete for clean edges.
Case study 2 — annotating slides on a laptop (teacher with no numpad)
The teacher used OSK to emulate numpad for precise eraser adjustments during on-the-fly whiteboarding. Later they switched to Paint 3D for its slider because it’s easier to control with touch/pen.
Case study 3 — pixel art (game dev)
For pixel art you often want single-pixel precision. Use Ctrl + Numpad +/- for single pixel changes or use the Pencil/Brush size dropdown to lock exact sizes; avoid large preset erasers that break crisp edges.
When bigger isn’t better: eraser pitfalls to watch for
Color swapping: In classic Paint, right-click color is background. If eraser behaves like “draw with background color,” check Color 2 setting — you might be drawing instead of deleting.
Anti-aliased edges: Big eraser on jagged or anti-aliased edges can create halos — prefer selection/delete or masking in GIMP/Photoshop.
Tool mismatch: Some “erasers” are actually brushes that paint the background color. If you need true transparency, use layers (Paint lacks layers — use Paint.NET/GIMP).
Key Takeaways
Use the Size dropdown in Paint’s Home ribbon for the fastest increase. Microsoft Support
Ctrl + Numpad + / − gives one-pixel precision resizing — great for power users. Microsoft Learn
No numpad? Use On-Screen Keyboard, an external numpad, or remap keys (AutoHotkey) as workarounds.
For soft/large erasing or non-destructive edits, switch to Paint 3D, Paint.NET, or GIMP.
Selection + Delete is often faster than dragging an eraser for block removals.
FAQs (People Also Ask)
Q: How do I make the eraser bigger in Paint without a numpad?
A: Use the Size dropdown on the Home ribbon as the simplest fix. For incremental changes, open the Windows On-Screen Keyboard and use Ctrl + (OSK) Numpad +/−, or plug in an external numpad or remap a key with AutoHotkey.
Q: Can I make a soft (feathered) eraser in MS Paint?
A: No — classic Paint only has hard erasers. Use Paint 3D, GIMP, or Photoshop for soft/feathered erasing and non-destructive masks.
Q: Why does the eraser draw a color instead of erasing?
A: Paint’s eraser sometimes paints the background color (Color 2). Reset Color 2 to white (or the canvas color) or use selection + Delete for true removal.
Q: Are there keyboard shortcuts to change eraser size in Paint 3D?
A: Paint 3D primarily uses sliders and tool settings for size; there isn’t a universal Ctrl+Numpad shortcut equivalent. Check the tool pane for size controls.
Conclusion
If you’ve ever asked how to increase the size of eraser in paint, the path is straightforward: start with Paint’s Size dropdown, use the Ctrl+Numpad shortcuts when you need pixel control, and apply practical workarounds for laptops without numpads. When Paint’s primitive toolset slows you down, reach for Paint 3D or a free editor like Paint.NET for better brushes, soft erasing, and more responsive sizing. Try the quick methods above next time you clean an image — and if you want, I can create step-by-step annotated screenshots showing each method (tell me which Windows version you’re using).
If you found this useful, subscribe to SmashingApps for more practical Windows tips — or tell me what device you’re on (laptop, Surface, desktop) and I’ll tailor shortcuts and an image walkthrough.
Now loading...


