Now loading...
If you are thinking, What is the Power of Screenshots? then you would be wondered to know, Windows Screenshots are incredibly useful for a variety of reasons, whether you need to show someone an error message, capture an image for a presentation or just to remember something. In Windows, taking screenshots is a simple, yet powerful feature that can help you work more productively. In this guide, we will show you how to take screenshots on Windows machines, step-by-step.
If you are interested, please read here How to Master Mac OS to Navigate Your Mac Like a Pro
Step 1: Understanding the Different Types of Windows Screenshots
There are several types of screenshots available in Windows. The most common types are full-screen, active-window, and custom-selection. Full-screen screenshots capture everything on the screen, including the taskbar and any other open windows. Active-window screenshots capture the active window, and custom-selection screenshots allow you to select a specific area of the screen to capture.
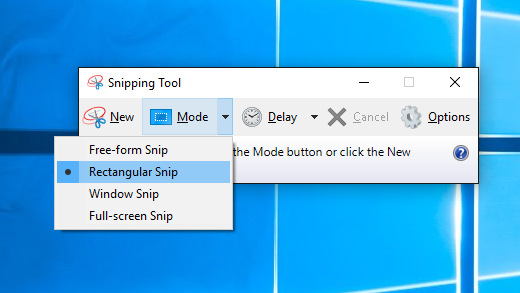
To take a full-screen screenshot, press the “PrtScn” button on your keyboard. To take an active-window screenshot, press “Alt” + “PrtScn” buttons. To take a custom-selection screenshot, press “Windows” + “Shift” + “S” keys, which opens the Snipping Tool application where you can select the area of the screen you want to capture.
 Windows 11 for Seniors
The Ultimate Beginner’s Guide to Master Your New PC. Learn Windows 11 with Large Text and Step-by-Step Illustrated Explanations Paperback – December 10, 2022
Step 2: Utilizing the Keyboard Shortcut Commands
Learning keyboard shortcuts are a great way to master windows screenshots quickly and efficiently. In addition to the aforementioned “PrtScn” and “Alt” + “PrtScn” shortcut keys, you can also use “Windows” + “PrtScn” keys to capture the entire screen and save it as an image file. The image is automatically saved to your Pictures folder under a subfolder named “Screenshots.”
Step 3: Utilizing the Snipping Tool for Windows Screenshots
The Snipping Tool is a built-in Windows application that allows you to take custom-selection for windows screenshots. To open the Snipping Tool, search for “snipping tool” in the Windows search bar, or locate it in the Windows Accessories folder in the Start menu. Once open, click “New” to start taking a screenshot. You can then select the area of the screen you want to capture by clicking and dragging the cursor.
Once you have selected the area you want to capture, you can save the image by clicking on “File” and selecting “Save As.” You can also copy the screenshot to your clipboard by clicking on “Edit” and selecting “Copy.”
Step 4: Utilizing Third-Party Screenshot Applications
If you need more advanced windows screenshot options, there are several third-party applications available that offer additional functionality. Some popular options include Lightshot, Greenshot, and Snagit. These applications offer features such as the ability to annotate screenshots, capture scrolling windows, and record videos of your screen.
Most third-party screenshot applications offer a free trial period, after which you will need to purchase a license. However, if you only need to take basic screenshots, the built-in options for windows screenshots are more than sufficient.
Conclusion: Enhancing Your Productivity with Windows Screenshots
Screenshots are a valuable tool that can help you work more efficiently and effectively. Whether you’re troubleshooting an issue, creating a presentation, or just need to remember something, Windows makes it easy to take screenshots of your screen. By utilizing the different types of screenshots available, utilizing keyboard shortcuts, and exploring third-party applications, you can take full advantage of this powerful feature and enhance your productivity.
Now loading...


